> ## Documentation Index
> Fetch the complete documentation index at: https://docs.deepidv.com/llms.txt
> Use this file to discover all available pages before exploring further.
# Manual Review
> Manually review and manage verification sessions
> Review flagged sessions, inspect verification badges, and make informed approve or reject decisions from the Admin Console.
Not every verification is black and white. When deepidv's automated checks surface warnings or edge cases, sessions land in **Submitted** status for your team to review. This guide walks through the full manual review process — what to look at, how to evaluate it, and when to approve, reject, or void.
***
## Session Statuses
Every session moves through a lifecycle:
| Status | What it means |
| ------------- | ----------------------------------------------------------------------- |
| **Pending** | Session created — the applicant hasn't started yet |
| **Submitted** | Applicant finished the flow — ready for your review |
| **Verified** | Approved — all checks passed or were manually accepted |
| **Rejected** | Denied — one or more checks failed your review criteria |
| **Voided** | Invalidated — excluded from reporting (test sessions, duplicates, etc.) |
***
## Verification Badges
When you open a session, deepidv displays a grid of **verification badges** — each one representing a check that ran during the session. Badges show a green checkmark for passing results or a red X for failures, giving you an at-a-glance summary before you dig deeper.
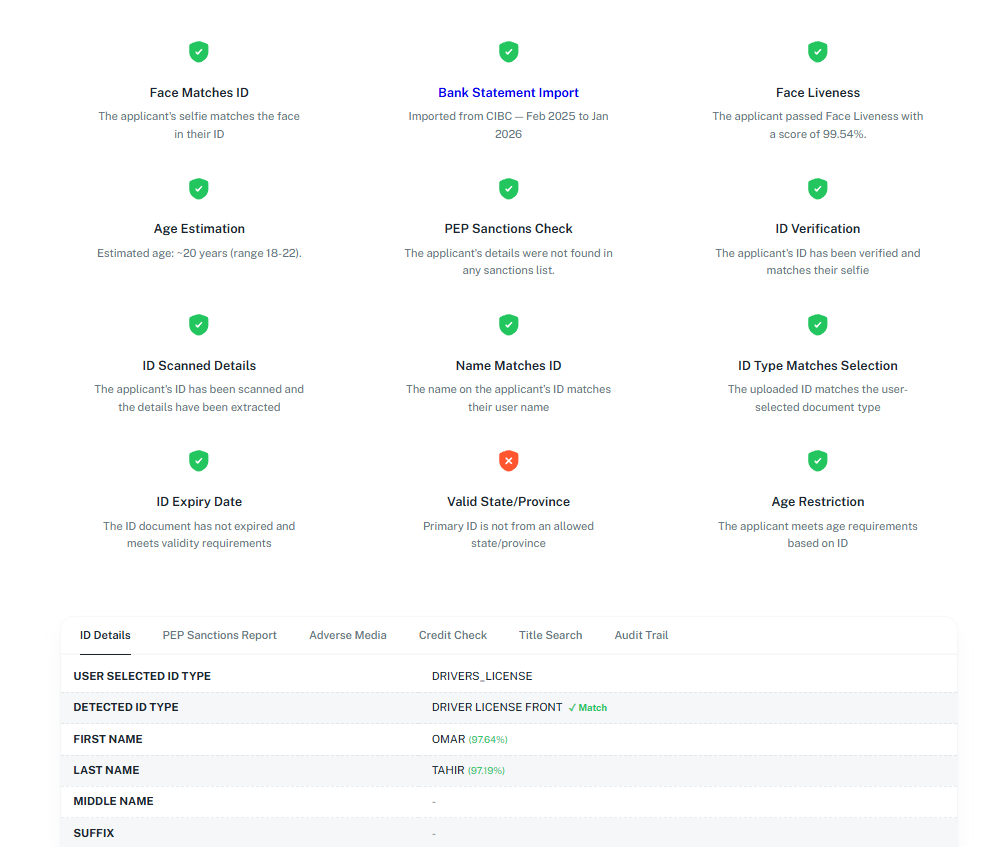 Here's what each badge covers:
| Badge | What it tells you |
| ----------------------------- | ---------------------------------------------------------------------------------- |
| **Face Matches ID** | Whether the applicant's selfie matches the photo on their ID document |
| **Face Liveness** | Whether the applicant passed the liveness check (includes confidence score) |
| **ID Verification** | Whether the submitted ID was validated and the selfie matches |
| **Age Estimation** | The estimated age range based on facial analysis |
| **PEP Sanctions Check** | Whether the applicant was found on any sanctions or PEP lists |
| **Bank Statement Import** | Whether bank data was successfully retrieved (includes institution and date range) |
| **ID Scanned Details** | Whether the ID was successfully scanned and key fields extracted |
| **Name Matches ID** | Whether the name on the ID matches the name provided by the applicant |
| **ID Type Matches Selection** | Whether the uploaded document matches the type the applicant selected |
| **ID Expiry Date** | Whether the ID document is still valid and hasn't expired |
| **Valid State/Province** | Whether the ID is from an allowed state or province |
| **Age Restriction** | Whether the applicant meets the minimum age requirement based on their ID |
Badges with a red X are the fastest way to identify what needs your attention. Start there and work outward.
***
## How to Conduct a Thorough Manual Review
Open the session detail view and scan the verification badges at the top. Any red X badges are your starting point — they highlight exactly which checks raised concerns.
deepidv already runs automated validation on every document — extracting text, checking expiry dates, and scanning for tampering. Your job is to evaluate the flagged items:
1. **Check the ID Details tab** — review extracted fields like name, date of birth, document number, and expiry. Confidence scores are shown next to each field.
2. **Compare the detected ID type** against what the applicant selected — a mismatch could indicate confusion or an intentional swap.
3. **Look for tampering signals** — if the document fraud analysis flagged anything, inspect the uploaded images closely for signs of editing, cropping, or physical manipulation.
4. **Verify the expiry date** — expired documents should generally be rejected unless your policy allows them.
Check the face matching and liveness outcomes:
1. **Face match confidence** — deepidv compares the selfie to the ID photo and returns a similarity score. Low scores may indicate a mismatch, but poor lighting or camera quality can also be a factor.
2. **Liveness score** — a high score means the applicant was confirmed as a live person. Low scores may flag printed photos, replayed videos, or deepfake attempts.
3. **Age estimation** — if the estimated age range conflicts with the date of birth on the ID, investigate further.
Review the risk-related tabs:
**PEP & Sanctions**
* **No matches** — low risk, no hits on global watchlists.
* **Matches found** — review each match carefully. Check the match score, country, datasets, and whether it's a true positive or a false positive based on name similarity and date of birth.
**Adverse Media**
* Review any flagged media mentions, legal proceedings, or negative press tied to the applicant.
**Title Search / Credit Check**
* If these services were part of the workflow, review the results in their respective tabs for any red flags.
The **Audit Trail** tab shows a chronological log of every event in the session — when it was created, when the applicant started, when each check completed, and any reviewer actions taken. Use this to understand the full timeline.
***
## Making a Decision
After your review, you have three options:
* Document appears authentic
* Selfie matches the ID photo
* Liveness score is acceptable
* No relevant PEP/sanctions hits
* All badges are green or explainable
* Document looks tampered or forged
* Selfie doesn't match the ID
* Confirmed sanctions or PEP match
* Strong indicators of fraud
* Failed age or expiry restrictions
* Test or duplicate session
* Created in error
* Applicant requested cancellation
* Session should be excluded from reporting
When rejecting a session, always add **review notes** explaining your reasoning. This supports internal quality assurance, compliance audits, and team training.
***
## Filtering and Search
Use the Admin Console's filtering tools to narrow down sessions:
| Filter | Options |
| --------------- | ---------------------------------------------- |
| **Status** | Pending, Submitted, Verified, Rejected, Voided |
| **Date range** | Filter by creation or submission date |
| **Applicant** | Search by name or email |
| **External ID** | Filter by your internal reference ID |
| **Workflow** | Show sessions from a specific workflow |
Filter by **Submitted** status to see all sessions waiting for manual review. This is the queue you should be checking regularly.
***
## Review Best Practices
The verification badge grid gives you an instant snapshot. Red X badges tell you exactly where the session has issues — start your review there instead of reading everything top to bottom.
Apply the same criteria to every session. Document your reasoning in the review notes so other team members can follow the same logic and maintain consistency.
Don't make decisions based on a single data point. A borderline liveness score combined with a name mismatch and a PEP hit paints a very different picture than any one of those alone.
When inspecting uploaded IDs, zoom in on the images to check for subtle signs of editing, missing security features, or inconsistent fonts and spacing.
Add clear, specific notes when rejecting a session. This builds an audit trail for compliance, helps with disputes, and gives your team a reference for similar cases in the future.
Set a cadence for reviewing submitted sessions. The faster you review, the better the applicant experience — and the less likely they are to drop off while waiting.
Here's what each badge covers:
| Badge | What it tells you |
| ----------------------------- | ---------------------------------------------------------------------------------- |
| **Face Matches ID** | Whether the applicant's selfie matches the photo on their ID document |
| **Face Liveness** | Whether the applicant passed the liveness check (includes confidence score) |
| **ID Verification** | Whether the submitted ID was validated and the selfie matches |
| **Age Estimation** | The estimated age range based on facial analysis |
| **PEP Sanctions Check** | Whether the applicant was found on any sanctions or PEP lists |
| **Bank Statement Import** | Whether bank data was successfully retrieved (includes institution and date range) |
| **ID Scanned Details** | Whether the ID was successfully scanned and key fields extracted |
| **Name Matches ID** | Whether the name on the ID matches the name provided by the applicant |
| **ID Type Matches Selection** | Whether the uploaded document matches the type the applicant selected |
| **ID Expiry Date** | Whether the ID document is still valid and hasn't expired |
| **Valid State/Province** | Whether the ID is from an allowed state or province |
| **Age Restriction** | Whether the applicant meets the minimum age requirement based on their ID |
Badges with a red X are the fastest way to identify what needs your attention. Start there and work outward.
***
## How to Conduct a Thorough Manual Review
Open the session detail view and scan the verification badges at the top. Any red X badges are your starting point — they highlight exactly which checks raised concerns.
deepidv already runs automated validation on every document — extracting text, checking expiry dates, and scanning for tampering. Your job is to evaluate the flagged items:
1. **Check the ID Details tab** — review extracted fields like name, date of birth, document number, and expiry. Confidence scores are shown next to each field.
2. **Compare the detected ID type** against what the applicant selected — a mismatch could indicate confusion or an intentional swap.
3. **Look for tampering signals** — if the document fraud analysis flagged anything, inspect the uploaded images closely for signs of editing, cropping, or physical manipulation.
4. **Verify the expiry date** — expired documents should generally be rejected unless your policy allows them.
Check the face matching and liveness outcomes:
1. **Face match confidence** — deepidv compares the selfie to the ID photo and returns a similarity score. Low scores may indicate a mismatch, but poor lighting or camera quality can also be a factor.
2. **Liveness score** — a high score means the applicant was confirmed as a live person. Low scores may flag printed photos, replayed videos, or deepfake attempts.
3. **Age estimation** — if the estimated age range conflicts with the date of birth on the ID, investigate further.
Review the risk-related tabs:
**PEP & Sanctions**
* **No matches** — low risk, no hits on global watchlists.
* **Matches found** — review each match carefully. Check the match score, country, datasets, and whether it's a true positive or a false positive based on name similarity and date of birth.
**Adverse Media**
* Review any flagged media mentions, legal proceedings, or negative press tied to the applicant.
**Title Search / Credit Check**
* If these services were part of the workflow, review the results in their respective tabs for any red flags.
The **Audit Trail** tab shows a chronological log of every event in the session — when it was created, when the applicant started, when each check completed, and any reviewer actions taken. Use this to understand the full timeline.
***
## Making a Decision
After your review, you have three options:
* Document appears authentic
* Selfie matches the ID photo
* Liveness score is acceptable
* No relevant PEP/sanctions hits
* All badges are green or explainable
* Document looks tampered or forged
* Selfie doesn't match the ID
* Confirmed sanctions or PEP match
* Strong indicators of fraud
* Failed age or expiry restrictions
* Test or duplicate session
* Created in error
* Applicant requested cancellation
* Session should be excluded from reporting
When rejecting a session, always add **review notes** explaining your reasoning. This supports internal quality assurance, compliance audits, and team training.
***
## Filtering and Search
Use the Admin Console's filtering tools to narrow down sessions:
| Filter | Options |
| --------------- | ---------------------------------------------- |
| **Status** | Pending, Submitted, Verified, Rejected, Voided |
| **Date range** | Filter by creation or submission date |
| **Applicant** | Search by name or email |
| **External ID** | Filter by your internal reference ID |
| **Workflow** | Show sessions from a specific workflow |
Filter by **Submitted** status to see all sessions waiting for manual review. This is the queue you should be checking regularly.
***
## Review Best Practices
The verification badge grid gives you an instant snapshot. Red X badges tell you exactly where the session has issues — start your review there instead of reading everything top to bottom.
Apply the same criteria to every session. Document your reasoning in the review notes so other team members can follow the same logic and maintain consistency.
Don't make decisions based on a single data point. A borderline liveness score combined with a name mismatch and a PEP hit paints a very different picture than any one of those alone.
When inspecting uploaded IDs, zoom in on the images to check for subtle signs of editing, missing security features, or inconsistent fonts and spacing.
Add clear, specific notes when rejecting a session. This builds an audit trail for compliance, helps with disputes, and gives your team a reference for similar cases in the future.
Set a cadence for reviewing submitted sessions. The faster you review, the better the applicant experience — and the less likely they are to drop off while waiting.